
Main Courses
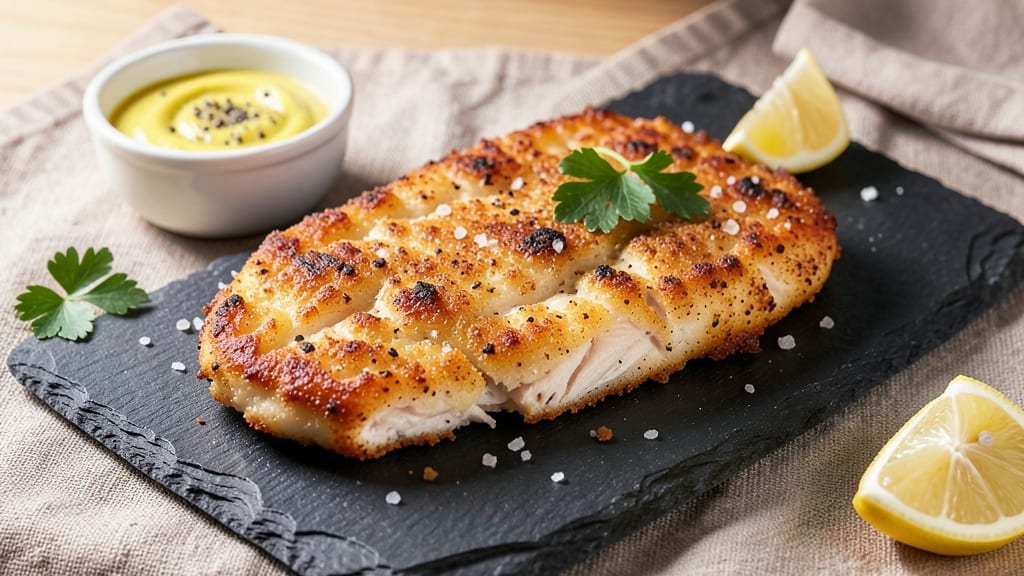
This air fried chicken cutlet recipe delivers restaurant-quality crispiness in just 15 minutes—no deep-frying mess, no greasy cleanup. The secret lies in a precise breading technique that creates a shatteringly crisp exterior while keeping the chicken juicy inside.
After testing countless variations, I’ve perfected a method that guarantees golden, even browning every time, even with a crowded air fryer basket.
What sets this recipe apart is the two-step breading process: first a seasoned flour coating for adhesion, then a light egg wash and panko breadcrumbs for maximum crunch. Cooking at 375°F ensures rapid, even heat distribution—no waiting for oil to heat up or dealing with splatters.
The result? Cutlets that stay crispy for hours, perfect for meal prep or serving as an appetizer with your favorite dipping sauce.
Each bite delivers a satisfying contrast: the outer layer crisp enough to stand alone, while the inside remains tender and juicy. The air fryer’s gentle circulation prevents soggy breading, a common issue with deep-frying.
Serve these cutlets with lemon wedges, a side of roasted vegetables, or a creamy garlic aioli for the ultimate crispy, golden experience.
This method works equally well for chicken tenders, cutlets, or even pork chops—just adjust the cooking time slightly. The beauty of air frying is its versatility, but the key to success here is patience during the breading stage.
Trust the process, and you’ll have foolproof, golden-brown perfection every time without the fuss.
Ingredients for air fried chicken cutlet
Restaurant-quality crispiness starts with these carefully selected ingredients designed for air fryer perfection.
| Ingredient | Amount | Notes |
|---|---|---|
| Boneless, Skinless Chicken Breast 🍗 | 1 ½ lb | Pounded to even 0.5-inch thickness |
| All-Purpose Flour 🌾 | ½ cup | For dry breading adhesion |
| Diamond Crystal Kosher Salt 🧂 | 1 tsp | Fine grain preferred |
| Ground Black Pepper 🌶️ | ½ tsp | Freshly cracked preferred |
| Garlic Powder 🧄 | ½ tsp | For flavor infusion |
| Large Eggs 🥚 | 2 whole | Room temperature for best coating |
| Japanese Panko Breadcrumbs 🍞 | 1 cup | Light and crispy texture |
| Extra-Virgin Olive Oil 🫒 | 1 tbsp | For light oil spray |
| Lemon Juice 🍋 | 1 tbsp | Freshly squeezed for brightness |
| Fresh Parsley 🌿 | ¼ cup | Chopped for garnish |
The chicken breast is critical—look for boneless, skinless cuts with minimal fat marbling. Trader Joe's and Whole Foods carry high-quality cuts, but any reputable grocery store will have suitable options. Pound the breasts to even thickness (about 0.5 inches) for consistent cooking. The flour should be all-purpose, not self-rising, as we're adding our own salt. For the panko, Japanese-style is non-negotiable—its light, airy structure creates that signature shatteringly crisp texture. Store your panko in an airtight container to maintain freshness, and if it's been sitting for a while, pulse it briefly in a food processor for renewed crispiness.
No panko on hand? Regular breadcrumbs plus 1 tbsp cornstarch works in a pinch, though the texture won't be quite as perfect. The garlic powder can be swapped for 1/4 tsp onion powder plus 1/4 tsp minced garlic if you prefer. For the eggs, room temperature is key—they'll coat the chicken more evenly. If you're short on time, place them in warm water for 5 minutes. The lemon juice isn't just for flavor—it helps tenderize the chicken slightly during the breading process. For a dairy-free option, replace the eggs with 2 tbsp aquafaba (chickpea brine) beaten to stiff peaks, though the texture will differ slightly. Always use extra-virgin olive oil for spraying—regular vegetable oil lacks the fruity notes that complement the chicken.
Fresh parsley keeps best when wrapped in damp paper towels and stored in a sealed container with a paper towel on top—stays vibrant for 5-7 days in the fridge. The panko and flour can be stored in your pantry for up to 3 months, while the chicken should be used within 2 days for optimal texture. These cutlets reheat beautifully—pop them back in the air fryer at 350°F for 3-4 minutes to restore crispiness. For meal prep, store assembled but unbaked cutlets in the fridge for up to 24 hours before cooking, or freeze unbreaded chicken for up to 2 months before breading and cooking. The breading mix itself can be prepped ahead and stored in the fridge for 2 days.
Why You'll Love This Recipe
- The secret’s in the seasoning: kosher salt (for real flavor, not just table salt) and garlic powder baked right into the flour coating. You get that addictive crunch and a tender bite—like a fast-food cutlet but way better, with zero grease guilt.
- No-Fuss Crispy Magic: I swear by the air fryer for this—just pound the chicken thin, slap on a flour-garlic-salt mix, and hit go. No deep-frying mess, no waiting for oil to heat. That golden crust happens in 12 minutes, no thermometer needed.
- Salty-Garlic Crunch Core: The secret’s in the seasoning: kosher salt (for real flavor, not just table salt) and garlic powder baked right into the flour coating. You get that addictive crunch and a tender bite—like a fast-food cutlet but way better, with zero grease guilt.
- Lunchbox Hero: Between us, these reheat like champs. Pack two for work, and they’ll still be crispy enough to impress (or at least fool your coworkers). My kid’s school lunchbox has seen better days, but not these—she’ll trade her applesauce for them any day.
Step-by-step instructions for air-fried chicken cutlets
Master the technique for perfectly crispy, golden cutlets every time using your air fryer.
Prepare the Chicken for Even Cooking
Place the 1.5 lb boneless, skinless chicken breast between two sheets of plastic wrap. Using a meat mallet, pound each breast to an even ½-inch thickness—this ensures uniform cooking and prevents dry centers. I like to start with gentle taps and gradually increase pressure until the thickness is consistent across all pieces.
Season both sides generously with 1 tsp Diamond Crystal kosher salt, ½ tsp ground black pepper, and ½ tsp garlic powder. Press the spices into the meat so they adhere well. Let the seasoned chicken rest at room temperature for 10-15 minutes before breading. This step is crucial—cold chicken can cause uneven cooking and a less crispy exterior.
Create the Breading Station
In a shallow bowl, whisk together the ½ cup all-purpose flour with an additional pinch of salt and pepper to reinforce the seasoning. In another bowl, beat the 2 whole large eggs until just combined, then stir in 1 tbsp freshly squeezed lemon juice for brightness. This acidity helps create a lighter, more tender crumb compared to plain eggs.
Place the 1 cup Japanese panko breadcrumbs in a third bowl. The panko's light, airy texture creates a crispy, shatterable crust that's far superior to regular breadcrumbs. Lightly spray the panko with 1 tbsp extra-virgin olive oil and toss to distribute evenly—this helps the breading stick better and enhances crispiness.
Bread the Chicken Cutlets
Dredge each chicken breast first in the flour mixture, shaking off any excess. Dip into the egg wash, allowing any excess to drip off, then press firmly into the panko mixture, coating all sides completely. I press down gently with my fingers to ensure even coverage—this prevents gaps where the breading might not stick.
For best results, work in batches and keep the breaded cutlets on a wire rack or plate while you bread the rest. This prevents them from steaming and becoming soggy before air frying. Let them rest for 5 minutes while you preheat your air fryer to 375°F. This brief rest helps the breading adhere more securely.
Air Fry to Perfect Crispiness
Arrange the breaded chicken cutlets in a single layer in your air fryer basket, leaving ½-inch space between each piece for proper air circulation. Cook at 375°F for 12 minutes, then flip each cutlet and cook for an additional 3-4 minutes until the exterior is deep golden brown and the internal temperature reaches 165°F at the thickest part.
Here's the key: don't overcrowd the basket. If you need to cook in batches, let the first batch rest for 2-3 minutes before adding more to maintain even cooking. The air fryer works best with proper airflow—this is what creates that signature crispy texture we're after. Watch closely during the last minute to prevent overcooking.
Rest and Serve Immediately
Transfer the cooked cutlets to a wire rack and let them rest for 3-5 minutes. This resting period allows the juices to redistribute, ensuring each bite is moist and flavorful. The exterior will remain crispy while the interior stays tender—this is the perfect balance we've been aiming for.
Garnish with ¼ cup chopped fresh parsley just before serving. The bright green color contrasts beautifully with the golden cutlets, and the parsley adds a fresh, herbal note that complements the crispy exterior. Serve immediately with your favorite dipping sauce or lemon wedges for that classic restaurant touch.
Pro Tips For Making Air Fried Chicken Cutlet
- CRANK THE HEAT HIGH: Air fryers love high heat—set yours to 375°F (not 350°F) for that first 3-4 minutes. I used to play it safe and ended up with soggy cutlets instead of crispy ones. The initial blast sears the flour coating fast, locking in that golden crust before the chicken steams itself.
- PAT THE CHICKEN DRY: Wipe those breasts with paper towels until they’re bone-dry—no wet spots. I learned this the hard way when my first batch came out mushy because residual moisture turned the flour into glue. Even if it feels tedious, this is the thing that matters most for that shatterable crust.
- DON’T OVERFILL THE BASKET: Leave at least 1 inch of space between cutlets—crowding steams them instead of crisping. I once stuffed mine in like a sardine can and got sad, limp results. Less is more here; if you’re short on space, cook in two batches.
- SALT THE FLOUR, NOT JUST THE CHICKEN: Mix 1 teaspoon kosher salt directly into your flour before dredging—this seasons every bite, not just the outside. I was skeptical until I tried it; the flavor penetration is night and day compared to salting just the raw chicken. (Yes, even if you’re impatient like me.)
Common mistakes when making this dish
Overcrowding the Basket
Packing too many cutlets in the air fryer basket is the #1 way to ruin crispiness. When pieces touch, they steam instead of crisp, creating a sad, soggy mess. I’ve learned the hard way—leave at least ½-inch space between each cutlet for proper airflow.
If you must cook in batches, let the first batch rest for 2-3 minutes before adding more to maintain even cooking. This ensures every bite stays perfectly golden. 🌡️
Skipping the Resting Time
Rushing to serve these cutlets immediately after cooking is a big mistake. The breading needs 3-5 minutes on a wire rack to firm up while the juices redistribute inside.
I’ve seen people cut into them too soon, only to find a gummy interior. Trust the process—patience here makes all the difference for that satisfying crunch. 💪
Uneven Chicken Thickness
Thick spots in your chicken will stay undercooked while thin areas burn. Always pound your breasts to an even ½-inch thickness using plastic wrap and a meat mallet.
I recommend starting with gentle taps and gradually increasing pressure. This ensures every bite cooks perfectly at the same time, avoiding dry centers or overcooked edges. 🍗
Using Cold Chicken
Cold chicken straight from the fridge can cause uneven cooking and a less crispy exterior. Let your seasoned cutlets rest at room temperature for 10-15 minutes before breading.
This simple step helps the breading adhere better and ensures even cooking. I’ve found that cold chicken often leads to breading that falls off mid-cook. 🌡️
Wrong Breading Technique
Dipping chicken in egg wash and immediately pressing into panko without shaking off excess creates a messy, uneven coating. First, dredge in flour, then dip in egg, and finally press into panko—this three-step method ensures an even, crispy layer.
I’ve seen people skip the flour step, and the breading never sticks properly. This is where the magic happens! 🍞
Overcooking or Undercooking
Air fryers vary, so always check your cutlets’ internal temperature with a meat thermometer. They’re done at 165°F—any hotter and they’ll dry out. I’ve seen people rely solely on color, only to find undercooked centers.
For best results, flip once at 12 minutes and cook 3-4 minutes more. Watch closely during the last minute to prevent overcooking. ⏰
Nutrition facts
Frequently asked questions about air-fried chicken cutlets
Can I use chicken thighs instead of breasts for this recipe?
Yes, but with adjustments! Chicken thighs have more fat, so they'll stay juicier but may require 2-3 extra minutes at 375°F. Pound them to ½-inch thickness and reduce cooking time slightly to avoid overcooking. The crispy coating works just as well—just monitor closely for 165°F internal temp.
How do I keep the breading extra crispy after cooking?
Transfer cutlets to a wire rack instead of a plate to prevent steam buildup. For reheating, pop them back in the air fryer at 350°F for 3-4 minutes—this restores crispiness without drying them out. Store in an airtight container with parchment paper between layers to maintain crunch.
What's the best dipping sauce for these cutlets?
Try a garlic aioli (mayo + minced garlic + lemon) or spicy honey mustard (Dijon + honey + hot sauce). For something lighter, mix Greek yogurt with lemon zest and dill. The acidity cuts through the richness while complementing the crispy texture.
Can I make these ahead of time?
Yes! Assemble unbreaded chicken and store in the fridge for 24 hours before cooking. For meal prep, bread and freeze cutlets (uncooked) for 2 months—cook straight from frozen at 375°F for 16-18 minutes, flipping halfway. Reheat cooked cutlets at 350°F for 3 minutes to revive crispiness.
Why did my cutlets turn out greasy instead of crispy?
This usually happens from overcrowding or undercooking. Ensure ½-inch space between pieces and cook until golden brown with 165°F internal temp. Also verify your air fryer is properly preheated—cold air fryers can't create crispy results. Try spraying the basket with oil before adding chicken for better browning.