
Main Courses
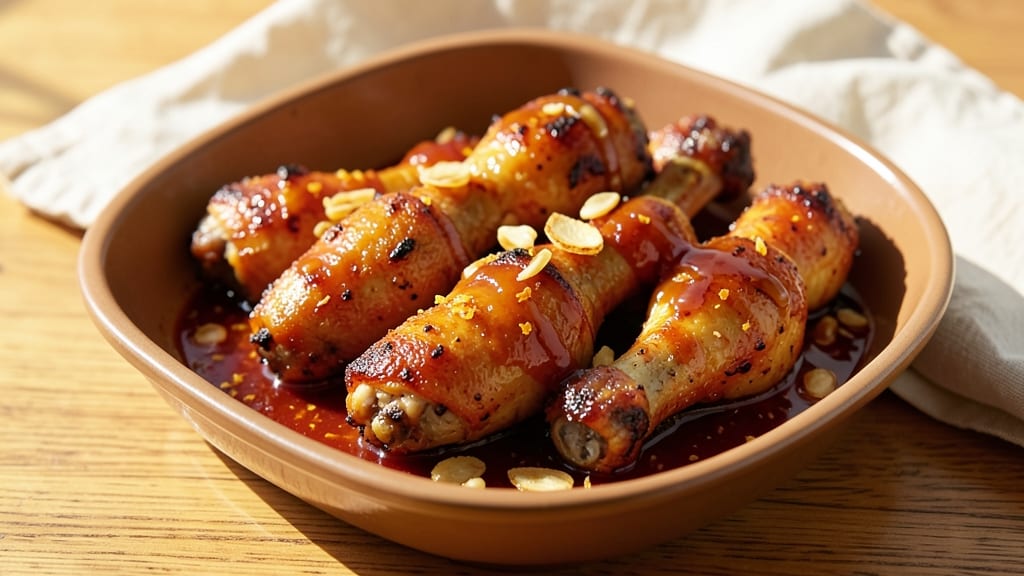
This baked orange chicken drumsticks recipe delivers crispy golden edges and sticky-sweet glaze in just 45 minutes—no deep-frying required. The secret lies in a marinade that tenderizes while building flavor, followed by a high-heat bake that creates that coveted crunch.
I developed this version after years of perfecting restaurant-quality results at home, where the balance of citrus, honey, and spices transforms ordinary drumsticks into a showstopping main course.
The process is simpler than it sounds: drumsticks marinate for 30 minutes in a tangy-sweet blend of orange juice, honey, and aromatic spices, then bake until the skin crisps and the glaze caramelizes. This method ensures juicy meat inside while delivering that irresistible crispy exterior that makes every bite satisfying.
The glaze isn't just sweet—it's complex, with a subtle tang from the orange zest that cuts through the richness.
What you'll end up with is a plate of perfectly glazed drumsticks where each piece offers crispy edges that shatter slightly and tender meat that falls apart easily.
The aroma alone will have everyone gathering around the table, and the visual appeal—golden brown with glossy glaze—makes it perfect for special occasions or weeknight dinners that feel like a celebration. Serve with steamed rice and stir-fried vegetables for a complete meal.
This recipe works equally well for meal prep or last-minute gatherings, making it a versatile addition to your cooking repertoire. The marinade can be made ahead, and the baking time is flexible enough to accommodate different oven temperatures.
Trust me, once you try this version, you'll never go back to the deep-fried original—the flavor is just as rich, but with a fraction of the mess and guilt.
Ingredients for baked orange chicken drumsticks
Sweet, tangy, and perfectly crispy—these ingredients transform simple drumsticks into a restaurant-worthy centerpiece.
| Ingredient | Amount | Notes |
|---|---|---|
| Chicken Drumsticks 🍗 | 1 ½ lb | Bone-in, skin-on preferred |
| Fresh Orange Juice 🍊 | ¾ cup | Freshly squeezed, no pulp |
| Honey 🍯 | ½ cup | Wildflower or clover preferred |
| Orange Zest 🍊 | 1 tbsp | From 1 large orange |
| Minced Garlic 🧄 | 4 cloves | Freshly minced for potency |
| Soy Sauce 🍜 | 2 tbsp | Low-sodium preferred |
| Brown Sugar 🍚 | 2 tbsp | Packed lightly |
| Ground Ginger 🌿 | 1 tsp | Freshly grated preferred |
| Ground Cinnamon 🌶️ | ½ tsp | Freshly ground for warmth |
| Salt 🧂 | 1 tsp | Diamond Crystal preferred |
| Black Pepper 🌶️ | ½ tsp | Freshly cracked |
| Cornstarch 🌾 | 1 tbsp | For crispy glaze texture |
| Vegetable Oil 🫒 | 1 tbsp | For tossing drumsticks |
The chicken drumsticks are the foundation, so pick plump, bone-in pieces with skin intact for that crispy magic. Trader Joe's or Costco often have the best quality at reasonable prices—look for freshness, not freezer burn. The orange juice should be freshly squeezed (none of that carton stuff), and if you're using a juicer, strain out the pulp for a silky glaze. Honey is non-negotiable here—wildflower or clover adds depth that store-brand versions miss. For the zest, grab a Microplane and go slow—you want fine, fragrant threads, not chunks. The garlic? Freshly minced makes all the difference, but if you're in a pinch, pre-minced works (just pat it dry first to avoid soggy skin).
No fresh orange juice? Freshly squeezed grapefruit juice works in a pinch, though the flavor shifts slightly. Subbing honey for maple syrup? Use half the amount—it's sweeter and can overpower. Running low on soy sauce? Coconut aminos mimic the umami perfectly. The cornstarch is key for that crispy glaze—don't skip it, even if you're not worried about gluten. For the spices, ground ginger is better than fresh here (it's more concentrated), but if you've got fresh, finely grate just 0.5 tsp. The brown sugar adds caramel depth, but white sugar in a bind? It'll work, though the glaze might not darken as beautifully. Toss the drumsticks in oil right before baking—this helps the skin crisp without frying.
Marinate the drumsticks for at least 30 minutes (overnight is even better), but don't let them sit too long or they'll get mushy. The glaze thickens as it bakes, so start checking at 35 minutes—you want golden brown with glossy edges. Store leftovers in an airtight container for up to 3 days, but reheat gently (microwave ruins the crisp). For meal prep, bake an extra batch and freeze the glazed drumsticks—reheat at 350°F for 10 minutes straight from frozen. The glaze keeps best when refrigerated, so if you're making it ahead, store it in a sealed jar with a thin layer of oil on top to prevent drying.
Why You'll Love This Recipe
- One-Pan Magic: The drumsticks go right on the sheet pan—no pots, no pans, no mess. I toss them with orange juice, honey, and garlic, then bake until the edges are sticky and golden. Honestly, it’s the kind of recipe that makes me feel like I actually cooked something, even when I didn’t lift a finger after prepping.
- Citrus Kiss: That bright orange juice and zest cut through the richness of the honey and chicken—it’s sweet, tangy, and just a little sharp. The garlic? Oh, it’s there, but it’s balanced, not overpowering. It’s the kind of flavor that makes you reach for seconds without even thinking.
- Game for Any Day: Pack these for lunch the next day—they stay juicy and flavorful, no reheating needed. Or serve them at a picnic, potluck, or even a fancy dinner (no one will guess they’re this easy). Between us, they’re my go-to for game day, too—everyone grabs seconds.
- Budget-Friendly Feast: Drumsticks are cheaper than thighs or breasts, and this recipe stretches a few bucks far. The honey and orange juice might seem like small luxuries, but they make the whole dish feel special. Plus, leftovers taste just as good reheated as they do fresh—so you’re basically getting two meals for the price of one.
Step-by-step instructions for glazed orange chicken drumsticks
Here's how to achieve that perfect balance of sticky-sweet glaze and crispy skin every time.
Create the Orange Glaze
In a medium saucepan, combine the 0.75 cup fresh orange juice, 0.5 cup honey, 2 tablespoons soy sauce, 2 tablespoons brown sugar, 1 tablespoon orange zest, 4 cloves minced garlic, 1 teaspoon ground ginger, and 0.5 teaspoon ground cinnamon. Bring to a gentle simmer over medium heat and let it cook for 5-7 minutes until slightly thickened.
You'll notice the mixture reduces and becomes aromatic—this concentrated flavor is what makes the glaze so irresistible. Stir occasionally to prevent sticking, and keep an eye on it so it doesn't burn. The glaze should coat the back of a spoon when you lift it out of the pan.
Once thickened, remove from heat and whisk in the 1 tablespoon cornstarch to help create that signature crispy texture. Let the glaze cool slightly while you prepare the chicken.
Prep and Season the Chicken
Pat the 1.5 lb chicken drumsticks completely dry with paper towels—this is crucial for crispy skin. Season both sides generously with 1 teaspoon salt and 0.5 teaspoon black pepper, pressing the seasoning into the meat so it adheres well.
In a large bowl, toss the seasoned drumsticks with the 1 tablespoon vegetable oil until evenly coated. This oil helps create that beautiful caramelized crust in the oven. Arrange the drumsticks on a parchment-lined baking sheet in a single layer, skin-side up.
Here's the thing—don't overcrowd the pan. You want space between each piece so the hot air can circulate and crisp the skin properly. If you're working with more than four drumsticks, you'll need to bake them in batches.
Bake for Crispy Skin
Preheat your oven to 425°F while you prepare the chicken. This high temperature is key to achieving that crispy skin we're after. Once preheated, place the baking sheet on the middle rack and bake for 25 minutes.
After 25 minutes, flip the drumsticks over and brush each piece generously with the orange glaze you prepared earlier. Return to the oven and bake for another 15-20 minutes until the skin is deep golden brown and crispy, and the internal temperature reaches 165°F.
Watch the skin carefully during the last few minutes—it goes from golden to deep brown very quickly. If you see the glaze starting to bubble vigorously, that's your signal to check the doneness. The drumsticks are done when the skin is crispy and the meat is tender when pierced with a fork.
Glaze and Serve
Once the chicken is fully cooked, transfer the baking sheet to a wire rack. Let the drumsticks rest for 5 minutes before brushing them with any remaining glaze from the pan. This final step ensures every bite has that perfect balance of sweet and savory.
Serve immediately while the skin is still crispy. The contrast between the sticky-sweet glaze and the crispy skin is what makes these drumsticks so addictive. Pair with steamed rice or roasted vegetables for a complete meal.
Don't skip the resting time—it allows the juices to redistribute, keeping the meat moist and flavorful. If you're serving these to guests, you might want to keep the extra glaze warm in a small saucepan so you can drizzle it over the drumsticks just before serving.
Pro Tips For Making Baked Orange Chicken Drumsticks
- CRANK THE HEAT FIRST: Start your drumsticks at 450°F (230°C) for the first 10 minutes—this sears the skin and locks in juices before the sauce takes over. I used to bake at 375°F the whole time, and the skin always turned soggy halfway through.
- ZEST BEFORE JUICING: Grate the orange zest first, then juice—it keeps the aromatic oils from dissolving into the liquid. I learned this after my first batch tasted flat; the zest just sat at the bottom of the pan like confetti.
- DON’T OVERMIX THE SAUCE: Stir the orange juice, honey, and garlic just until combined—lumps in the sauce caramelize into sticky pockets of flavor. I used to blend it smooth, and the sauce never stuck to the chicken like it should.
- REST THE DRUMSTICKS: Let the cooked drumsticks sit 5 minutes under foil before serving—this keeps the meat from drying out while you finish the sauce. I skipped this once and served them straight out of the oven; they were rubbery by the time I cut into them.
Storing and reheating your leftovers
Refrigerator Storage
Store leftover glazed drumsticks in an airtight container for up to 3 days—the glaze actually gets more concentrated as it sits. Let them cool completely before refrigerating to prevent condensation, which can make the skin soggy.
I like using glass containers because they keep the glaze from absorbing plastic flavors. 💛
Freezer Prep Tips
For longer storage, freeze the drumsticks uncooked in a single layer on a tray before transferring to a freezer bag—this prevents them from sticking together. Label with the date and freeze for up to 2 months.
When ready to cook, bake straight from frozen at 400°F for 50-55 minutes, adding 5-10 extra minutes to ensure the center reaches 165°F.
Reheating Methods
Oven method is best for crispy skin: place drumsticks on a baking sheet at 375°F for 15-20 minutes, brushing with a little extra glaze halfway through. For microwave reheating, cover with a damp paper towel and heat in 30-second bursts at 50% power, stirring between each interval to avoid drying out.
Glaze Preservation
Save any leftover glaze in a small glass jar with a tight seal—it’ll keep in the fridge for up to 1 week. To use, simply reheat in a saucepan over low heat until warm, then drizzle over reheated drumsticks.
The glaze thickens as it cools, so thin with 1 tsp water if needed before reheating. ✨
Meal Prep Strategy
Double the recipe and store half for later—these drumsticks reheat beautifully for lunchboxes or weeknight dinners. Pack them in bento-style containers with rice and steamed veggies for grab-and-go meals. Just add a small side of extra glaze to keep things exciting. 🍗
Nutrition facts
Frequently asked questions
Can I use boneless chicken drumsticks for this recipe?
Boneless drumsticks will work, but the cooking time and texture will differ slightly. Since they lack the bone's natural moisture barrier, they'll cook faster (20-25 minutes total) and may dry out more quickly. For best results, reduce oven temperature to 400°F and check for doneness at 165°F internal temperature. The glaze application remains the same, but you'll want to serve these immediately for maximum crispiness.
How do I adjust the recipe for spicier flavor?
Add ½ teaspoon cayenne pepper or 1 teaspoon red pepper flakes to the marinade for mild heat, or increase to 1 teaspoon cayenne for significant spice. For a smoky kick, add ½ teaspoon smoked paprika to the glaze. Always taste the glaze before baking—you can adjust heat levels after the fact by adding a pinch of chili powder or hot sauce when serving.
Why did my drumsticks turn out soggy instead of crispy?
Soggy skin usually means one of three things: the chicken wasn't dry before baking, the oven temperature wasn't high enough, or the drumsticks were overcrowded. Always pat drumsticks completely dry with paper towels, use 425°F for maximum crisp, and leave 1-inch gaps between pieces. If your oven runs hot, reduce to 400°F and check frequently. The glaze should caramelize, not steam.
Can I make this recipe in an air fryer?
Preheat your air fryer to 375°F and cook drumsticks for 12 minutes, flip, then glaze and cook 8-10 more minutes until internal temp reaches 165°F. The air fryer creates crispiness without needing high oven heat. For best results, brush with extra glaze in the last 3 minutes to achieve that signature caramelization. Use a spray of oil instead of tossing in oil before air frying.
What's the best way to serve these drumsticks?
These drumsticks shine as a main course with complementary sides. Serve with jasmine rice to soak up the glaze, steamed bok choy or broccoli for freshness, and a simple cucumber salad to cut through the richness. For a complete meal, add fried egg noodles or stir-fried green beans. The contrast of textures and temperatures makes every bite exciting!