
Main Courses
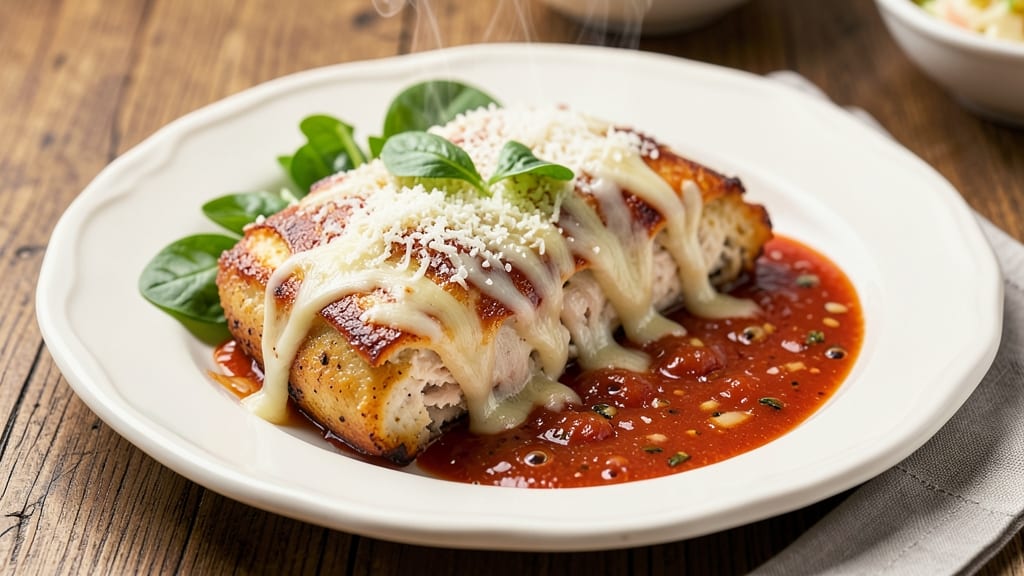
This baked chicken parmesan recipe delivers all the crispy, cheesy goodness without a single breadcrumb in sight. 🔥 The secret lies in a Parmesan-crusted coating that creates a golden, shatteringly crisp exterior while keeping the chicken impossibly tender inside.
After years of perfecting this technique, I've finally cracked the code for restaurant-quality results at home—no breadcrumbs required. What sets this recipe apart is the two-step coating process: first, a light dusting of flour and cornstarch for structure, then a thick layer of grated Parmesan mixed with Italian seasoning.
This creates a crust that's both crispy and flavorful, with no soggy texture. The chicken bakes in a rich marinara sauce until bubbling and golden, ensuring every bite is juicy and packed with flavor.
By the time you pull it from the oven, you'll have perfectly golden chicken with a crispy Parmesan crust that shatters at the slightest touch. The sauce clings to the chicken, creating a saucy, satisfying bite that's impossible to resist.
This is comfort food at its finest—elegant enough for company but simple enough for weeknights. Serve with a side of garlic bread, a fresh salad, or roasted vegetables to complete the meal. The best part? This recipe scales perfectly for feeding a crowd or meal prepping for the week.
Ingredients for baked chicken parmesan recipe no breadcrumbs
The secret to restaurant-quality Parmesan-crusted chicken without breadcrumbs lies in these 13 ingredients.
| Ingredient | Amount | Notes |
|---|---|---|
| Boneless, Skinless Chicken Breasts 🍗 | 1 ½ lb | Pounded to even thickness |
| All-Purpose Flour 🌾 | ½ cup | For light dusting |
| Cornstarch 🌾 | 2 tbsp | For extra crispiness |
| Freshly Grated Parmesan Cheese 🧀 | 1 cup | From a block, not pre-shredded |
| Italian Seasoning 🌿 | 1 tbsp | Dried blend preferred |
| Large Eggs 🥚 | 2 whole | Beaten for egg wash |
| Marinara Sauce 🍅 | 2 cups | Homemade or quality jarred |
| Fresh Mozzarella Cheese 🧀 | 8 oz | Sliced into thin strips |
| Garlic Cloves 🧄 | 4 cloves | Minced for sauce |
| Extra-Virgin Olive Oil 🫒 | ½ cup | For coating |
| Kosher Salt 🧂 | 1 tsp | Plus extra for seasoning |
| Ground Black Pepper 🌶️ | ½ tsp | Freshly ground preferred |
| Fresh Basil Leaves 🌿 | ¼ cup | Chopped for garnish |
The chicken breasts are the foundation, and even thickness is key—pound them to about 1/4-inch. Costco sells pre-pounded breasts, but I prefer to do it myself for consistency. For the Parmesan, grate it yourself from a wedge—pre-shredded contains anti-caking agents that ruin the texture. The Italian seasoning blend should include basil, oregano, and thyme for that classic flavor. If you're using jarred marinara, Rao's or Barilla are my go-tos for restaurant-quality taste. For the mozzarella, fresh is ideal, but low-moisture shredded works in a pinch—just squeeze out excess moisture before using.
No Italian seasoning? Mix 1 tsp dried oregano, 1 tsp dried basil, and 0.5 tsp dried thyme to replicate the blend. Short on fresh basil? Dried basil at one-third the amount works, though fresh is preferred. The cornstarch is non-negotiable for crispiness—it creates a lighter, crunchier crust than flour alone. For the olive oil, extra-virgin with fruity notes adds richness, but any good-quality oil will work. If you're watching calories, reduce the olive oil to 3 tbsp and add an extra splash of marinara sauce to compensate. The eggs are just for adhesion, so don't overthink it—room temperature eggs work best for even coating.
Prep the chicken and sauce ahead, but hold off on coating until ready to bake—it loses crispiness if stored. The coated chicken can sit in the fridge for up to 4 hours before baking. Leftovers reheat beautifully in the oven at 375°F for 10-15 minutes, covered with foil to prevent drying. Store in an airtight container for 3-4 days or freeze for 2 months. For meal prep, portion the sauce separately—it reheats better alone. The Parmesan crust stays crispy when reheated, but if it softens, broil for 1-2 minutes to restore crunch.
Why You'll Love This Recipe
- No-Fuss Crisp: I swear by that cornstarch flour mix—it gives you that golden crunch without the breadcrumb mess. Just toss the chicken in the seasoned blend, slap it on a tray, and let the oven do the work.
- Cheesy Magic: Freshly grated Parmesan isn’t just for topping—it’s the secret weapon here. That salty, nutty bite melts into the chicken while keeping the outside perfectly crisp. (Yes, even my picky husband asks for seconds.)
- Meal Prep Hero: This bakes up beautifully for lunches—just reheat slices in a pan with marinara or toss cold into salads. Honestly, I make a double batch every Sunday because it’s that reliable.
- Budget-Friendly Feast: Skinless breasts stretch further than you’d think, and Parmesan goes a long way when you grate it yourself. Leftovers? Wrap them in tortillas with marinara for a no-guilt dinner. (My kids call it "fancy chicken.")
Step-by-step instructions for Parmesan-crusted chicken Parmesan
Here's how to achieve crispy, golden crusts without breadcrumbs—using just cheese and starch for that perfect texture.
👨🍳 Step 1: Pound and Season the Chicken
Place each of the 1.5 lb boneless, skinless chicken breasts between two sheets of plastic wrap. Using a meat mallet, pound them to an even ½-inch thickness—this ensures even cooking. I like to press down firmly but evenly to avoid tearing the meat.
Season both sides generously with ½ teaspoon kosher salt and ¼ teaspoon ground black pepper. The seasoning should adhere well to the surface. Let the seasoned chicken rest at room temperature for 15 minutes before breading—this helps the crust adhere better and prevents uneven cooking.
🍳 Step 2: Create the Parmesan Coating
In a shallow bowl, combine the ½ cup all-purpose flour and 2 tablespoons cornstarch. The cornstarch adds extra crispiness without breadcrumbs. In another bowl, beat the 2 whole large eggs until just combined. In a third bowl, mix the 1 cup freshly grated parmesan cheese and 1 tablespoon Italian seasoning.
Dip each chicken breast first into the flour mixture, letting any excess drip off. Then dip into the beaten eggs, allowing excess to drip away. Finally, press the chicken into the parmesan mixture, coating both sides thoroughly. The cheese should stick firmly—this is your crispy crust. Place the coated chicken on a wire rack set over a baking sheet to prevent sticking.
🔥 Step 3: Prep and Bake the Chicken
Preheat your oven to 425°F. Line a second baking sheet with parchment paper. Heat the ½ cup extra-virgin olive oil in a large oven-safe skillet over medium-high heat until shimmering. Carefully transfer the coated chicken to the skillet and cook for 2 minutes per side until golden brown.
Immediately transfer the skillet to the preheated oven. Bake for 12-15 minutes until the chicken reaches an internal temperature of 165°F and the crust is deeply golden. The cheese should be bubbly and crispy—this is when you know it's perfect. If the cheese browns too quickly, tent with foil for the last few minutes.
🥘 Step 4: Assemble and Bake with Sauce
Remove the chicken from the oven and reduce heat to 375°F. Spread 1 cup marinara sauce evenly over the bottom of the prepared baking sheet. Place the baked chicken on top of the sauce. Arrange 8 oz sliced fresh mozzarella cheese in even strips over each piece of chicken, then drizzle with the remaining 1 cup marinara sauce.
Return to the oven and bake for an additional 8-10 minutes until the cheese is melted and bubbly, and the sauce is slightly thickened. The chicken should be juicy with melted cheese clinging to every bite. If the sauce thickens too much, add a splash of water or pasta water to loosen it before serving.
🍽️ Step 5: Garnish and Serve
Remove from the oven and let rest for 2-3 minutes to allow the cheese to set slightly. Garnish each serving with ¼ cup chopped fresh basil leaves. The basil adds a bright, fresh contrast to the rich, cheesy flavors.
Serve immediately with a side of pasta or crusty bread to soak up the delicious marinara sauce. Each bite should deliver a perfect balance of crispy parmesan crust, juicy chicken, and melted mozzarella—all without a single breadcrumb in sight.
Pro Tips For Making Baked Chicken Parmesan Recipe No Breadcrumbs
- USE CORNSTARCH FIRST: I learned this the hard way—dusting the chicken with cornstarch before the flour creates a lighter, crispier crust without getting gummy. Just pat the breasts dry, sprinkle a thin, even layer of cornstarch (about 1 tablespoon total), then shake off the excess before dipping in flour.
- SALT THE FLOUR MIX: This isn’t just about seasoning—it’s about flavor distribution. Mix 1 teaspoon of salt into your flour-cornstarch blend before dredging. The salt dissolves slightly into the moisture on the chicken, so every bite gets that balanced seasoning instead of just the surface.
- DON’T OVERLOAD THE PARM: Freshly grated Parmesan is worth the effort, but too much turns the crust into a cheesy paste. Use about ¼ cup total for two breasts—sprinkle half before baking, then top with the rest after the first 10 minutes. The second layer melts into a golden blanket, not a soggy mess.
- BAKE IN BATCHES IF NEEDED: Crowding the pan steams the chicken instead of browning it. If you’re baking two breasts at once, leave at least 1 inch between them. Better yet, bake one tray at 425°F for 12–15 minutes, then rotate the pan and bake the second batch—your oven’s hot spots will thank you.
Troubleshooting your baked chicken parmesan recipe no breadcrumbs
Crust Too Soft?
If your Parmesan crust turns out soft instead of crispy, the issue is likely moisture. First, ensure your chicken is completely dry before coating—pat it thoroughly with paper towels. I also recommend chilling the coated chicken for 30 minutes in the fridge before baking to help the crust set.
Another trick? Add 1 tablespoon crushed cornflakes to your Parmesan mixture for extra crunch. This works surprisingly well and mimics breadcrumb texture without the actual crumbs. 💡
Cheese Not Melting Properly
When mozzarella stays stringy or doesn't melt, it's usually because the chicken wasn't hot enough when the cheese was added. Always bake the chicken to 165°F internal temperature before adding sauce and cheese.
For extra insurance, I recommend broiling for 1-2 minutes after adding the cheese to help it melt evenly. If using low-moisture shredded mozzarella, squeeze out excess moisture first—this prevents a watery sauce. 🧀
Sauce Too Watery
Watery sauce is often caused by overcooking or too much liquid in the pan. To fix this, reduce your oven temperature to 350°F for the final sauce-baking stage and cover loosely with foil.
For immediate results, stir in 1 tablespoon tomato paste or 1 teaspoon cornstarch mixed with 1 tablespoon water to thicken. I also recommend pre-cooking your marinara sauce for 5 minutes to reduce excess moisture before assembling. 🍅
Chicken Dries Out
Overcooking is the #1 cause of dry chicken. Use a meat thermometer and remove the chicken from the oven when it hits 160°F—it will rise to 165°F while resting. For extra juiciness, brine the chicken for 30 minutes before coating (1/4 cup kosher salt dissolved in 4 cups water).
Another pro trick: Add 2 tablespoons chicken broth to your marinara sauce before baking—it adds moisture without altering flavor. 🍗
Uneven Cooking
Thicker edges cooking faster than thinner centers? The solution is simple: pound your chicken breasts to an even ½-inch thickness before seasoning. If you notice one side browning faster, flip the baking sheet halfway through the bake.
For extra insurance, I recommend placing the chicken on a wire rack over a baking sheet—this allows heat to circulate evenly on all sides. 🔥
Crust Falls Off
When the Parmesan crust doesn't adhere, it's usually because the chicken wasn't properly dried or the egg wash wasn't thick enough. First, pat the chicken completely dry with paper towels before coating. Second, beat the eggs until frothy (not too thick) for better adhesion.
For extra grip, I add 1 teaspoon Dijon mustard to the egg wash—it acts as a natural binder. Let the coated chicken rest for 10 minutes before baking to help the crust set. 💪
Nutrition facts
Frequently asked questions
Why use cornstarch instead of breadcrumbs?
The cornstarch creates a lighter, crispier crust without the heaviness of breadcrumbs. When combined with Parmesan, it delivers that satisfying crunch while keeping the chicken juicy inside. Plus, it's gluten-free and works perfectly for those avoiding traditional breading!
Can I make this recipe ahead of time?
Coat the chicken and refrigerate it for up to 4 hours before baking. For the complete dish, assemble with sauce and cheese, then refrigerate for 2 hours before baking. The flavors meld beautifully overnight, making it perfect for meal prep. Just reheat at 375°F for 10-15 minutes.
What's the best way to keep the Parmesan crust crispy?
Chill the coated chicken for 30 minutes before baking to help the crust set. Also, bake at 425°F for the initial cooking—high heat creates that perfect crunch. If reheating leftovers, broil for 1-2 minutes to restore crispiness!
Can I use chicken thighs instead of breasts?
Yes, but adjust the cooking time! Thighs stay juicier longer, so bake for 18-20 minutes total (including the sauce stage). They'll need 165°F internal temp too. The Parmesan crust works beautifully on thighs—they just need more time to cook through.
How do I prevent the mozzarella from getting watery?
Use fresh mozzarella and squeeze out excess moisture before adding. For extra insurance, bake the chicken to 165°F first, then add the cheese. If using shredded mozzarella, opt for low-moisture varieties and pat them dry thoroughly.